HubSpot may be one of the most powerful, dynamic marketing tools out there, but did you know that it is also a robust event planning tool? HubSpot has been our preferred method of planning events in the past. Even better, HubSpot exceeds our expectations when it comes to event planning. If you use HubSpot for your ongoing marketing efforts, you know that it puts everything in one place – similarly, HubSpot will tie every aspect of your event together, intertwining it with your other marketing efforts.
Here’s how to plan an event of the year by solely using HubSpot for promotion.
Invitations & Communications:
It’s no secret that HubSpot knows email. One of the platform’s biggest advantages is its industry-leading email integrations. Whether you are B2B, B2C, or just planning an event, the most important part of planning an event is information sharing. When sending out information about your event, your messages should be informative (tell your readers what and when), compelling (create hype and FOMO around your event), and simple (don’t overwhelm recipients).
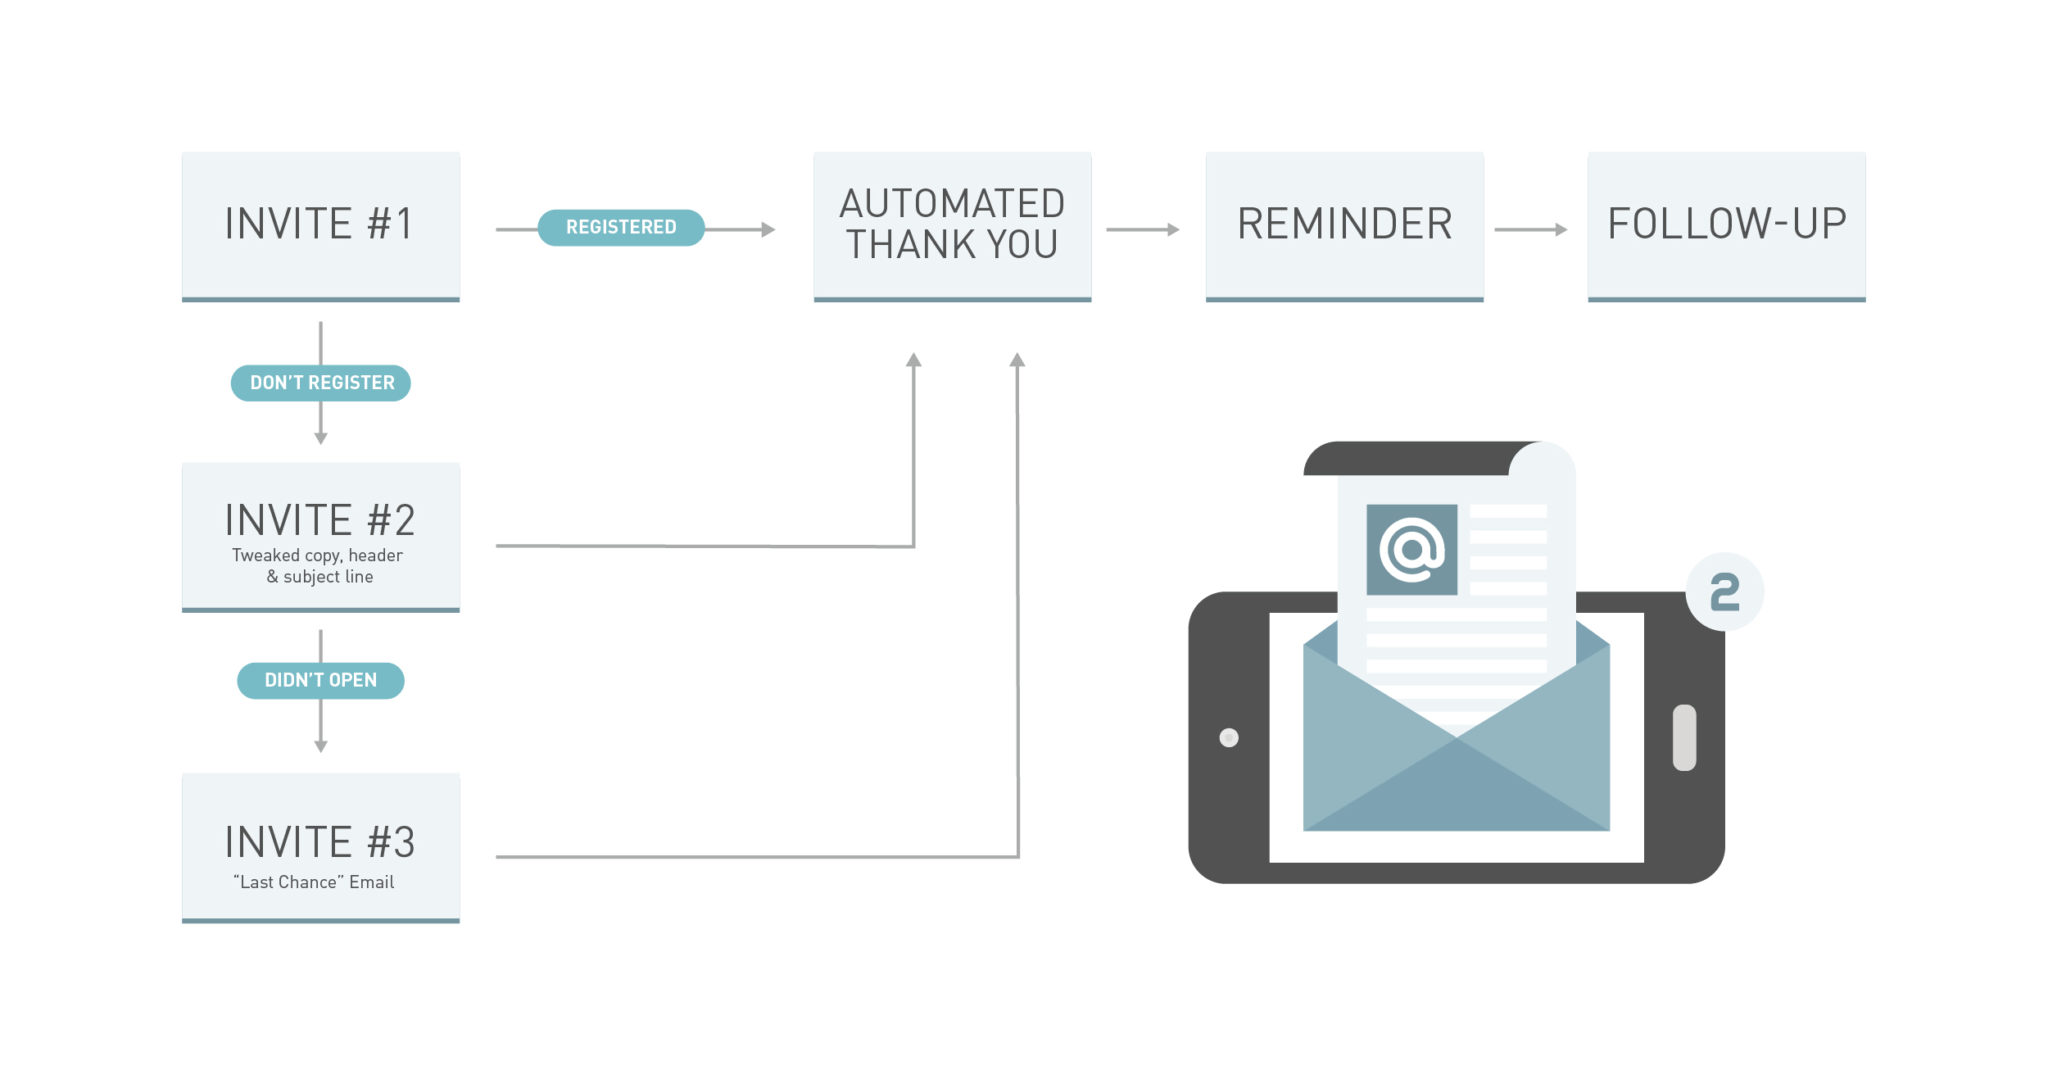
The best way to create consistent promotional messaging is to set up a simple event workflow. Set up the following workflow scenarios for your event in HubSpot:
Initial Invite Send:
Send this to your whole invite list. Use quality imagery, compelling copy, and efficient design.
Invite #2:
This email will be an additional attempt to get invitees to register. Use a new subject line, update the header image, and change up the copy and content locations in the email to make it feel different than the initial. This will go to those who didn’t register the first time around.
Invite #3:
This is what we will refer to as the “last chance” email. This email is for those who didn’t open Invite #2. Tweak the subject line to encourage an open this time around.

Sign-ups:
Many online event options only allow so much customization. It’s very important that your event sign-up options are as awesome as your event is going to be. Creating a custom landing page will really set your event apart from those that simply have a Facebook event, Eventbrite page, etc. After you have created the landing page, set up a HubSpot form for your event and drop it onto the page. This will allow people to submit their information to register for the event. Create a smart list from the form submissions to use for your additional pre-event and post-event communication.
Monitoring:
A huge benefit of running all of your event planning operations from one platform is having on-demand insights all in one place. You can quickly see all the reporting metrics and analytics – from email opens, to page views, form submissions, conversion triggers, and even social interactions – for each contact! You may be able to see some of these insights in other event platforms, but HubSpot allows you to treat your event like a marketing campaign and really dial into every aspect of your promotional efforts.
Day of Event:
Using HubSpot’s features doesn’t end with registration. In fact, it can even be used inside the event. Remember the days of sitting at a table, asking for names, and then using a highlighter to check them off as the line grew longer and your blood pressure got higher? Those days are gone. Setting up the ability for registrants to check in to the event can make your event much easier to operate and will also integrate your attendee metrics right into each registrant’s data within HubSpot.
Here’s how to set up a check-in system:
- Set up a landing page with a simple email form. This landing page will be used as a sign-in system.
- Shorten the link. For example, “[company name].com/checkin”. We put this on chalkboards at the entrance with instructions to check in on mobile phones (you can send out the link before the event as well).
- Create a thank you page that serves as a check-in confirmation, which can be shown to those who are in charge of the check-in duties. For our event, users who hadn’t signed up for the event were triaged to a computer for sign-up.
Creating a digital check-in system in HubSpot will allow you to tie everything together. Not only are you able to see how many people actually came to the event, but you can also send a nice follow-up email and create a field in your custom contact properties that will show each registrant’s event attendance (or lack thereof). Then, tie all event details right into your existing marketing initiatives!
Follow-Ups & Future Considerations:
An event follow-up is a nice touch for any well-run event. Create a simple email that shows how great the event was and how much you appreciate those who attended. Make it short and sweet, but also encourage attendees to continue to interact with you. In the follow-up email, insert a link to a Facebook album filled with event pictures (great if you had a photo booth!), send attendees to a calendar of upcoming events, or encourage them to share all the fun they had on social with your event’s hashtag. Whatever you do, don’t leave them hanging – give them another chance to engage.
As previously mentioned, when you use HubSpot for an event, you’re using a robust marketing platform, simplifying everything and storing campaign details and metrics all in one place.
There are some pretty awesome event platforms out there, but the truth is that most of them can’t tie everything together – promotion, attendance, real-time contact updates, and analytics insights – while also integrating all of these details into your existing marketing efforts. So, if you are into organization or want to tie your event into your current marketing initiatives, use HubSpot to make your event go from good to great.
Interested in learning more? Need help figuring out how to use HubSpot for your next event? Give us a shout! Pyxl is a HubSpot Platinum Solutions Partner for over 10 years, we simplify the process by providing expert services to ensure you’re maximizing your HubSpot platform’s full potential.
Updated: Nov 15, 2024
 Pramita Pramod
 Kati Terzinski
 Erin Murray